Empire Deluxe Enhanced Edition
Information Window
Quick Links:
Other Details Links:
The Information Window holds a great deal of information regarding the current selected unit and location. This window can be used to manipulate information about the unit. It can be detached and attached to the map window and hidden from view. To open it, click on one of the tabs on the right side of the mp window. To close it, click on the hide button at the bottom of the window.
Attaching/Detaching/Showing/Hiding
Being able to view the map is important, so the Information Window can be hidden or detached from its position to the right of the map. It can also be resized when attached by moving the mouse cursor to the left side of the Information Window.
When hidden, the tabs of the Information Window will still be displayed. The Information Window can be recalled by either clicking on the Tabs, or by pressing the appropriate key.
The Information Window And Map Window Focus
The map window will be in focus whenever you move the mouse across the map. It will also be focused when the mouse is moved over unused areas of the Information Window.
Some combo boxes and other controls come in focus when the mouse is moved over them. Their text usually changes size when this occurs.
Changing Data In The Information Window
There is data that can be manipulated through the various tabs of the Information Window. These are:
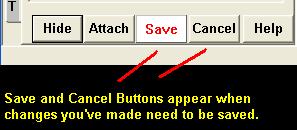
With the exception of altering the stacking tree, (which is instant), these changes will require a Save Instruction from you to commit the new data. The Save Button will flash whenever there have been changes applied that need to be changed.
In Addition, the following can be done in the information Window:
These actions and events, either invoke dialogs or send data without the requirement of pressing the Save Button.
The Terrain Tab
This tab describes the terrain in the square. A player can also enter text
notes on the square to be maintained if desired. He can also create and edit
"Order Points", which will automatically apply orders to units in that location
without orders under certain specified conditions.
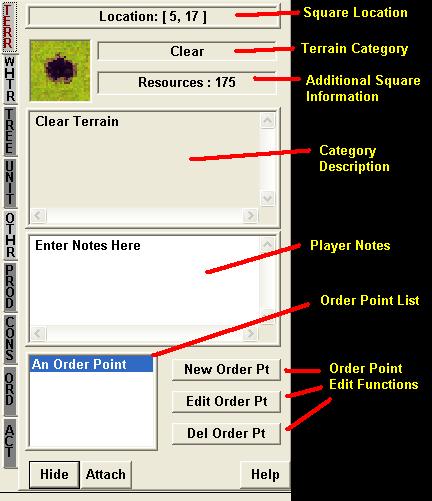
The Square Location tells the coordinates of the current selected square.
The Terrain Category is the name of the terrain in that square, as defined from the Terrain Database.
The Additional Information lists the existence of Roads, Resources, known Mines and Wasteland.
The Category Description for the specified terrain category is displayed.
The Player Notes is a free text area that a player can type in. It can only be displayed in the Information Window. If you enter data, it must be preserved by pressing the flashing Save Button.
The Order Points List and the Order Point Edit Functions enable you to create, edit and delete Order Points.
The weather tab will display the current weather for the selected location and list the forecast for future weather several turns ahead.

If System Weather is set in the setup rules, this will be the information regarding the weather in the current square.
The Unit Tree Tab lists all the friendly and enemy units you can see in the
selected location. The tree tab also allows stack manipulation and some limited
unit actions.

Units are displayed depending on their level and stacking order. Orbital Units will be at the top of the list, Sub-Ground Units at the bottom.
Each unit will have its name, hosted units, and annotation description adjacent
to it. The annotation symbols are defined in the Unit Tab
section.
For stacking, Units may be dragged and dropped within their respective hosts. No
unit can be dragged and dropped from one level to another (i.e. you cannot drag
a unit on the ground to the Over-flight level). Stacking changes are immediate,
no saving required.
Selecting a unit in the tree will make that unit the currently selected unit on the map.
For unit manipulation, select a unit in the tree, then right-click on it to get
a menu of Actions the unit can perform.

The Unit Tab provides information regarding the currently selected unit.

If you are the owner of the unit, you will be able to change the unit name. This
change must be Saved
before it is permanent.
Annotation Symbols - these represent text symbols showing different special
states of the unit. These symbols are:
(_) - Unit is in the sub level.
(O) - Unit is in the orbital level.
(^) - Unit is in the over-flight level.
(R) - Unit is in re-entry.
(*) - Unit is a capital.
(+) - Unit is important.
(L) - Unit has landed.
(D) - Unit is dug in.
Combat Effectiveness will be displayed as
<effectiveness level>(<experience level>)
This tab includes data regarding the resource drain, the score, allows for unit gifting, and enables the player to make and break treaties with others.
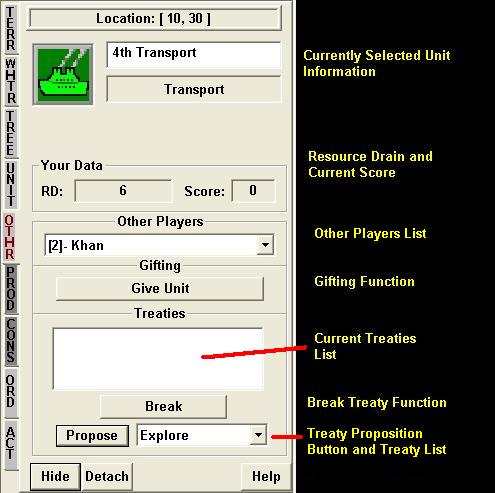
The currently selected unit will be displayed. If you are the owner of the unit, you will be able to change the unit name. This change must be Saved before it is permanent.
The Your Data Section,
The RD value describes your current the units available before resource drain. The
number in the parenthesis, if any, represents the adjustment that has come from
supply treaties.
The score is the player or his team's current score in the game, if the game has
scoring.
Other Players Data Section
In the Other Players List, you may select one of the other players in the player selection combo box, and
the current treaties with that player will be displayed.
Gifting - pressing the Give Unit Button will "Give" the currently selected unit to the
currently selected player. See gifting in the concepts section for more details.
Treaties Section
The list of treaties with the selected player will be displayed. To propose a
new treaty, simply select the desired treaty type from the treaties combo box,
and click the propose button.
To break an existing treaty, select the treaty from the current treaties list
and press the "Break" button.
Though treaties take time to perform, the proposal of a treaty is instant and
cannot be take back. Breaking a treaty can only be done on your active turn, and
is also instantaneous.
See treaties in the game concepts section for more information on them.
The Production And Construction Tabs
The Production and Construction Tabs are very similar, with the Production Tab having slightly more options. (Production Tab Pictured Below)
Selecting a unit type button from this and then saving it will clear out the producing unit's current orders, and install new production orders. If only the build number is changed and saved, the turns till completion will not be changed. But if the unit had more orders in its Order Queue, those orders will be removed.

The Unit Name and Production Efficiency are displayed for the currently selected unit.
Select a unit type to produce or construct from the list of available types
provided. The current type being produced/constructed will be highlighted.
Turn Comp - shows the turns it will take to complete this type.
In Prod/Const - number of producers/constructors currently working on that unit
type.
For production, the Number to build can also be specified. You may also check
the Unlimited check box for producing forever. This box is not available for
construction.
In the production dialog, an "Alert" button and a number box have been added next to the None - No Production option button. If None is selected, the user may depress the Alert Button and enter the production efficiency that will cause an alert for the city. when this efficiency is reached, the city's production dialog will reappear prompting the user for additional orders.
if a user enters a limited production amount in the production dialog, the production dialog will reappear upon completion of the specified number of units.
To save your changes to a unit's production or construction, make sure you press the flashing "Save" button at the bottom of the Information window.
The Orders Tab (a.k.a. Commands
Tab)

The Unit's Command Queue is a very useful and powerful feature of Empire Deluxe Enhanced Edition, and the Commands Tab gives you full access to manipulating and editing the selected Unit's Command Queue.
The Orders Tab will allow you to view and edit the select unit's Unit Command Queue. The Command Queue is the ordered list for orders for that unit. In the order listing, the order that is printed in red is the current order for that unit.
If a user edits the Unit's Command Queue, the changes must be saved to take effect.
This tab is essentially made up of two areas:

This is where the current state of the queue is displayed.
The Current Order and The Selected Order
The Unit's Current Order is represented in Red. If the user selects an order in the Command Queue, it will be represented in Gold. Do not confuse the Current Order, which is a game concept, with the Selected Order, which is an interface concept. The selected order is only the order you have currently selected, so that you can further manipulate the queue.
If you are creating or editing a Unit's command Queue and no current Order is specified, when the command Queue is saved, the first order in the queue will become the Current Order.
What is the Constructed Order?
Around and below are several buttons, which enable you to manipulate the queue. Many refer to the Constructed Order. This refers to the order you have built in the Available Orders Area.
Command Queue Area Buttons
A copy of the Constructed Order will be placed in the Unit's Command Queue in front of the Selected Order.
A copy of the Constructed Order will replace the Selected Order. This is useful for orders you do not wish to clear, but only change amounts, like production orders. In such an instance, the progress already made in the unit's current production would not be lost.
A copy of the Constructed Order will be placed in the Unit's Command Queue after the Selected Order.
The Selected Order will be moved one step up in the queue.
The Selected Order will be removed from the queue.
The Selected Order will be moved one step down in the queue.
This button will clear the Command Queue of all orders.
This button will copy the Selected Order into the Available Orders Area, for further editing.
This button will set the Selected Order as the Current Order.
This button will prompt you to load an orders file, which will then replace the entire unit Command Queue with the loaded orders.
This button will prompt you to save the current Unit Command Queue to a file.

The available orders area is where you can construct orders to add to a unit's command queue. The combo box of possible orders for this unit will always be listed, and there may possibly be other input controls visible for data required from you depending on the order selected.
Remember, a constructed order will not be used by a unit until it has
been entered into the Command Queue and those orders have been saved.
Depending on the order chosen from the possible orders list, different data may
be required to make the constructed order. The orders fall into several
categories:
Details on order construction types:
Orders Requiring No Further Data
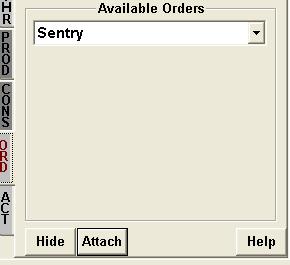
Some orders, such as Sentry, do not require further information to be constructed. In such cases, the order is ready to be added to the Command Queue.
Orders Requiring Path
Construction
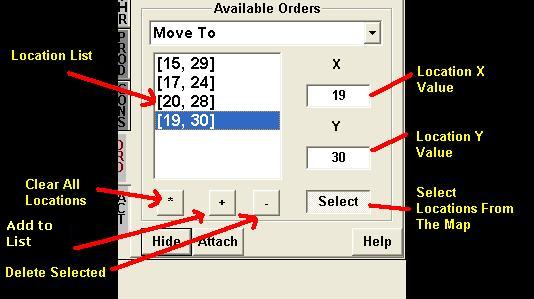
Location List -
You will need to build a list of ordered Locations representing the path.
After selecting a location on this list you can use the Delete Selected
buttons below to Remove your selection.
There is also another button, Clear All Locations, enabling you to clear the entire list.
You will be able to enter the values of X and Y for the location by hand if you choose. When the Add To List button is pressed, it will be added to the bottom of the list.
There is also a Select Locations From The Map Option. When this button
is pushed in, you can single click on the map to put a location
into the X and Y values, or double click to add the location to your
list. A single right click
will remove the last location from the list.
Orders Requiring Loading Details

Some orders, such as Load (Details) and Unload (Details), require information regarding what should be loaded.
The Load Manifest List shows the unit types and the specified quantity for that type that the unit will attempt to Load/Unload.
You can select a type to manipulate from the Type Selection List. You must enter the Unit Quantity, or specify Unlimited by checking the "U" check box next to the Quantity.
To add this type to the list, click on the Add Button ("+").
To remove a selected type from the list, click on the Remove Button ("-").
The Wait Time is the time in turns the transport will wait to Load/Unload. Enter the time
or check the unlimited box.
Orders Requiring A Specific Unit

Some orders, such as Maintain Position With Unit, require you to specify a unit. You may select a unit form the Unit Finder List, or press the Select button and then click on a unit on the map.
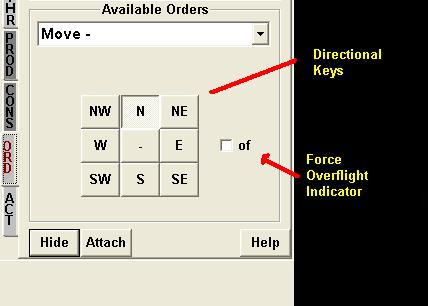
The Move (Directional) Order requires a specified direction. The Force Over-flight Indicator can also be checked when desired. The middle button will instruct the unit to 'burn' a movement point.

Some orders, such as Skip Turns, will require that you specify a number.
Orders Requiring A Unit and A Path

Some orders, such as Patrol, require that you specify a unit and a path.
Location List - You will need to build a list of ordered Locations representing the path. After selecting a location on this list you can use the Delete Selected buttons below to Remove your selection.
There is also another button, Clear All Locations, enabling you to clear the entire list.
You will be able to enter the values of X and Y for the location by hand if you choose. When the Add To Queue button is pressed, it will be added to the bottom of the list.
There is also a Select Locations From The Map Option. When this button
is pushed in, you can single click on the map to put a location
into the X and Y values, or double click to add the location to your
list. A single right click
will remove the last location from the list.
To specify the Unit, select a unit from the Unit Listing.
The Actions Tab allows the current selected unit to attempt to perform an
Action in the game. Be aware that such an attempt will clear any orders
it currently has in its command queue.
Some actions will not always be available, depending on the type and state of the
unit.
The available Actions on this tab are:
Movement :
First Row:
Second Row:
Third Row:
Fourth Row:
Fifth Row:
Sixth Row:
Seventh Row:
Eighth Row:
